Call Us Anytime
1300 138 499
Your wooden fence was once sturdy as they come, but sun, strong winds, and heavy rainfall have taken their toll. The results are a sagging, leaning, or rotting fence that have long lost their former glory.
While certain woods such as Pressure-treated lumber pumped full of preservatives and Cedar and Redwood are highly durable, they will need maintenance from time to time. They’re also expensive, so if you’re on a budget, you’ll need to take extra care of your fence.
While it may be tempting to replace the fence entirely, a fence repair is usually the more cost-effective solution.
In this fence fixing guide, we’ll show you how to:
A standard wooden fence will contain the following:
When repairing a fence, you’ll need to address each of these components individually. For example, posts that have rotted at the base require a different repair than a cracked fence board. Vegetation that has grown into the fence also needs to be removed or else it will continue to damage the fence.
Let’s go through the most common problem areas for wood fences and how you can fix or replace them.
Fence posts are susceptible to rot below or at ground level. This is especially common among posts that haven’t been treated with a preservative. The first sign of rot is usually a discoloration or softening of the wood, followed by warping and eventually crumbling.
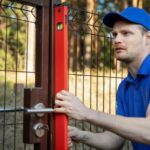
Leaning fence gates typically have the same issue as a leaning fence post – the gate posts have become rotten and unstable. The repair process is similar, but you’ll also need to take into account the weight of the gate.
Alternatively, you can straighten a leaning wooden gate by:
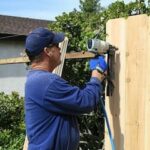
Damaged fence pailing can occur due to severe weather or external damage such as someone kicking a ball through it. No matter the cause, you’ll need to replace them to maintain your fence’s stability, privacy and aesthetic appeal.
Taking a proactive approach to fence maintenance will minimise any repairs that need to be carried out in the future. Wooden fences need to be sealed every 2-3 years and stained every 4-5 years.
The benefits of sealing and staining your fence include:
A new fence is a significant investment which can add much needed colour and protection to your home. However, it can be difficult to know when it’s time to replace or repair your fence. If your damaged fence lies within these parameters, then it may be time for a replacement:
The biggest issue facing wooden fences is rotting. If your fence post has rotted, then the rest of the fence is likely to follow suit. A good rule of thumb is if over 1/4 of your fence has been affected by rot, then it’s time to replace it entirely.
Missing or Damaged Boards
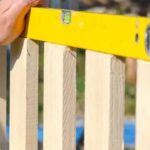
If you have missing or damaged boards, then it’s usually possible to replace them without replacing the whole fence. It’s not uncommon for fence panels to become loose over time, so check all screws and nails are tightened. If the damage is severe, then it may be necessary to replace a section of the fence.
If you’re able to catch termites early enough, then you can save your fence with some repairs. However, if the termites have caused significant damage (over 20-25% of your fence), it’s best to replace the fencet. It’s also wise to contact a pest control company to prevent future termite problems.
Unfortunately, your wooden fences won’t last forever. Even with regular care and maintenance, they will need to be replaced. Depending on the lumber quality and how well it’s been cared for, most fences will need to be replaced after 20 years.
If the problem with your existing fence is due to a manufacturing defect, then it may be covered by a warranty. Always check if your fence is still under warranty before attempting any repairs.
If you’re still not sure whether to repair or replace your fence, then it’s best to consult with a professional fencing contractor. They will provide a thorough damage assessment and give an accurate quote for the necessary work. You won’t have to look any further since we offer fencing installation services here at Sidepost which include pool fence installation, gate installation, and many others.
Vinyl fences are becoming increasingly popular because they’re easy to maintain and clean. However, their slats get damaged overtime, usually by severe weather conditions, and will need to be replaced.
Sometimes, a chain link fence top rail can bend or break. This usually happens when a branch or other debris falls on the fence.
Chain Link fence fabric damage is usually caused by severe weather, but it can also be caused by rust, vandalism or even a car accident.
Whether you need a fence repair or installation, our fencing contractors can make it happen. We use high-quality materials and our expertise to deliver top-notch services, ensuring your complete satisfaction.
Sidepost operates and has fencing contractors all across Australia, servicing major areas such as Melbourne, Sydney, Adelaide, Perth, Brisbane, Hobart, Gold Coast, Newcastle and Canberra. Contact us today or book online and we’ll send one of our qualified technicians to your home or business to provide a quote.
Want to learn more about fencing materials and how much you should pay? Check our guide on aluminium slat fencing and see if it’s the right fit for you!